Home Server – 2025 Edition
There have been a few small modifications to the “home server” since Home Server – 2023 Edition was published. However, 2025 was a year for a big change which prompted this update. In the end, the core hardware for the main home server was migrated from almost 15-year-old technology to things that were more modern i.e. less than five years old. This was not planned as the older equipment was not giving me any issues and was still fairly energy efficient usually running under 100W at idle, but due to some unfortunate events outlined in the “Background” section below, I ended up with this major overhaul. All the software and storage devices remained the same, although the layout in the case changed a bit and I lost a couple of SATA (storage) ports.
The second big difference, (and the one that made me change the case layout), is that I upgraded the graphics card in my gaming PC with a faster (and more importantly quieter) model. The replaced card, while not an AI powerhouse with 12G of VRAM, was put into the new home server so I could start playing around with running various AI workloads locally. I installed Ollama and Open WebUI to allow integration with other things in the house as well as having a self-contained “chatbot” for simple tasks. While I am not a fan of the current state of “AI” with its various impacts, I have been interested in the field for decades. During my undergraduate years, I learned and heavily used the LISP programming language (plus Emacs), and read up on things like neural networks in my free time! So it was nice to get play around with somewhat current implementations in the so-called “AI space”.
Background
For many years, the “home server” consisted of two fairly identical systems that had some sort of failover capabilities (see Home Server – 2023 Edition). Over most of that time, the servers ran in parallel and had automated health checks that would allow for one server to be taken down and the other would take over handling any tasks, (file storage, web server, DNS, DHCP, etc.), within about 30 seconds. This was fun and interesting to implement (and see in action), but the configuration was complex and sometimes the systems would get out of synchronization requiring about 30 minutes of manual work to get everything running properly again without losing data. While this did not happen often, it was still about two to three times a year, which was annoying. Therefore, in 2024, one server was set to be the “primary” handling all tasks while the “secondary” server only turned on a for a couple hours per day. During that time, the secondary server synchronized all files and configuration changes from the primary server since the last synchronization, (usually 24 hours ago). While the “cool” factor of having two servers in an automated, highly available configuration was lost, it simplified things greatly. Also, while switching the secondary server to the primary took some manual work, the process was well-documented and took about 45 minutes to complete.
Although the two servers were almost identical, the motherboards were from different manufacturers. While each motherboard had the same chipset and pretty much the same layout, when installing a 10G network card in each, one server did not recognize it. I could not find an official updated BIOS to see if that would fix things, but found a “like new” version of the working motherboard at a fair price on eBay, so bought that. At this time, the hardware was around 15 years old, so finding one for sale was pretty exciting. Also, when I opened things up, the motherboard looked and smelled like it had never been used! After installing everything and turning it on, fans started up and everything looked good. Except the screen remained blank. Then, after about 30 seconds, a small fire broke out on one corner of the motherboard. That really surprised me and I quickly pulled power from the computer. There was a fire extinguisher nearby, but everything settled down quickly enough that it was thankfully not needed as that would probably have been a huge mess. I am not sure what caused the fire, but after disassembling everything I found a metal screw in the bottom of the case near where the fire occurred. My suspicion is that this screw touched some of the electrical contacts under the motherboard causing the damage; I chalked the damage up to user error instead of a defect in the motherboard, so just ate the cost and did not try for a refund.
But now what? I had been thinking about replacing the home servers with newer and cheaper consumer-grade equipment for a while, but it just didn’t seem necessary, (and I like having ECC RAM). On the other hand, 15-year-old technology in this space was getting hard to find. I did not upgrade both servers as the one running on older hardware is doing well. However, I did overhaul most of what is now my primary home server except the storage and case.
CPU: AMD Ryzen 5 5600GT
The first component I select when building a PC is the CPU. This choice heavily influences the motherboard and RAM to use, which in turn helps narrow down many of the other components. I was looking for something that performed the same or better as what I had before and preferably consumed less power. Given that my current equipment was 15 years old at the time, this was not a difficult task. Unfortunately, that requirement did not lower the number of options much. However, since a chunk of those options on the ultra-low-power side used things like uncommon form factors, a soldered CPU and sometimes RAM, and/or without many expandability options, things started to narrow down a bit. I struggled a little with “enterprise” versus “consumer” equipment, but finally decided that this build would use consumer components that were less expensive and more readily available on the used market. While I bought things new this time, in several years if I want to tweak something like the CPU, I expect that it will be easier to find an old Ryzen alone over more enterprise options. I also wanted a CPU that included integrated graphics as even though I was planning to add a discreet GPU, I did not want to rely on that to display the BIOS or command-line. The 5600GT seemed to check all the boxes on performance, power usage, integrated graphics, and a common platform (AM4 and DDR4 memory) that would probably–just my opinion–be available on the used market for a while at decent prices. Plus, it came with an air cooler that I felt would meet my needs without spending a little more on something better. If I am wrong and more cooling is required, then adding a third-party cooler on an AM4 platform even years from now will hopefully be fairly easy if needed.
Motherboard: Asus PRIME B550-PLUS AC-HES
One regret that I have with this build is that I went with the B550 chipset due to the lack of additional PCIe lanes available for add-in cards. While I would have preferred to reduce some of the on-board USB and other connectivity that I do no use in a server allowing for more options on what I could install, that was not really an option when going with consumer hardware. One x16 PCIe slot would now be used by a graphics card for AI purposes and one x4 slot would be used by a 10G network adaptor. Adding any other PCIe card to the mix would severely cripple the speed of the networking. But, what else did I see needing? Well, this motherboard had two less spots for SATA storage devices than the prior one. While I am not too worried about storage, I do use two ports for redundant cache drives, two ports for redundant parity drives, and the rest for all my data. That leaves only two data drives in this configuration. That is sufficient for the amount of data that I store, although I like to have at least one “spare” slot to add a replacement drive when one fails or is in danger of failing, which they have every few years. However, there are options to convert one of the two currently unused M.2 NVMe slots into several hot-swapable SATA ports, plus still some room in the chassis to support at least four more SATA HDDs or SSDs, (and plenty more if–really when–I totally abandon 5.25 inch HDDs).
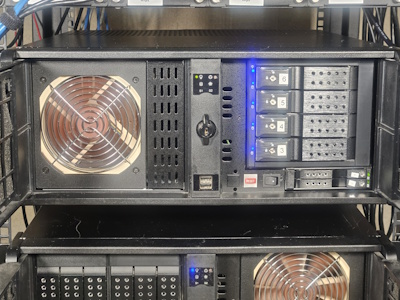
Case: iStarUSA D-407PL (link is not the exact model)
I have used the same cases for my home servers for a long time. There have been some technology improvements (such as higher-speed USB front ports), and cosmetic changes over time. There are also multiple brands and versions of this case out there, but I have not felt a need to change things. It is a 4U rack-mountable case with a good number of external 5.25-inch slots. In 2025, for both servers, I used three of the unused 5.25-inch slots to mount a 120mm air intake fan.
RAM: CORSAIR Vengeance LPX DDR4 2x16G 3600MHz
While this motherboard could handle up to 128G of RAM, I had no problems with the 32G of the last system, so went with that. Usually when building a server where performance is not as critical, I fill up the RAM to the maximum amount with a single “matching” kit. That is one regret I have with this build especially since the cost of RAM skyrocketed soon after. For selecting the brand of RAM, I took the “Qualified Vendor List” (QVL) for the motherboard, looked for two sticks that gave 32G, and then targeted the items listed that worked at the “fastest” recommended timings. I’m not messing with frequency and timings outside of defaults with this build, (other than using the recommended “best” factory-set SPD settings in the BIOS), so not looking for anything fancy.
Storage
The case used has seven external 5.25-inch bays–four on one side of the case and three on the other–and one external 3.25-inch bay. I used to have two “3-in-2” (meaning three slots for drives that fits in two bays of the case) trayless 5.25-inch hard drive chassis mounted on one side, a 120mm intake fan on the other side taking up the remaining three 5.25-inch bays, and a “2-in-1” trayless 2.5-inch chassis for solid state cache drives. However, the graphics card is so large that it required some re-arranging of the internal layout of things. Therefore, I moved the intake fan to the other side of the case behind the graphics card and bought a “4-in-3” hard drive chassis and installed it where the fan used to be. That leaves me one bay currently unused next to the fan and clear of the graphics card. I have a trayless drive chassis that fits in a single 5.25-inch bay that supports both a 5.25-inch and a 2.5-inch drive, which I will probably end up installing in the case. That would also require me adding an M.2 to SATA adaptor as I do not have the free PCIe lanes by other means. The challenge so far has been finding such an adaptor that supports hot-swapping drives. I am not too worried about needing to increase storage, but for replacing drives, it is nice to have open slots in which to put the new drives without having to deal with first taking out an existing drive in cases where the drive being replaced has not completely failed.
Drive Chassis:
- iStarUSA BPN-2535DE-SA 2.5″ HDD cage holding redundant cache drives
- StarTech.com HSB4SATSASBA 4 Drive Trayless 3.5″ HDD cage holding two parity drives and two data drives
- Kingwin KF-256-BK 2.5-inch and 3.5-inch cage, currently unused
Drives / Storage:
- Two SAMSUNG 870 EVO Series 2.5″ 500GB SATA drives for cache
- Four Seagate IronWolf ST4000VN006 4TB 5400 RPM SATA drives, with two for parity
- SANDISK Cruzer Fit 32G USB Flash Drive for the operating system (OS)
This ends up providing 8TB of storage. Since I am currently only using a little over 2TB with all my media, (I am not into the so-called “Linux ISO” scene, videography, or other things requiring high-storage), this should be more than enough for me for the foreseeable future. If I do ever want more space, one option without a full overhaul of the system would be to just upgrade the parity and data drives to larger versions.
Video: MSI GeFroce RTX™ 3080Ti VENTUS 3X 12G OC
I picked up this card new when it was on a “deep discount” around the release of the 40-series of nVidia graphics cards (GPUs). While $500 below MSRP seems like a huge deal, this card was panned by most reviewers I follow when it was first released due to its excessive price. The $800 price point when I picked it up seemed more like what it should have costed on day 1, so while I did not consider this a deal, it seemed fair. The plan was to build a gaming PC around this card, which I did. However, I could not get the fans to be quiet enough for use in the living room no matter how much I adjusted the fan curve, so ended up replacing the card later. After that, I used this card in my productivity computer for a while. I do not really play games on that PC, but did use the GPU to start to playing around with local AI. In 2025, I decided that I wanted to move the AI components to a central “always-on” server, so bought an Intel B580 for my productivity computer and moved the 3080Ti into the home server.
Networking: TRENDnet 10 Gigabit PCIe SFP+ Network Adapter
Since I had a couple of available SFP+ 10G ports on my switches, and 10G equipment has come down in price quite a bit over the years, I decided to install a 10G card in my servers. This card was chosen due to its relatively low price, while being from a brand that I knew. There were cheaper cards available, but those were from brands I had never encountered and some did not have the PCIe lanes needed to support 10G speeds. I have not done a lot of benchmarking, but file transfers between the servers is noticeably faster. I have not seen the advertised speed, but there are other considerations such as the speed of the storage. At some point I would like to do some more scientific benchmarking, but for sure it is faster than the prior configuration of four 1G ports hardware bonded into a single 4G connection.
Power: CORSAIR RM1000x
For power supplies (PSUs), I tend to go with Corsair or Seasonic branded ones these days. Currently, all PCs and servers in the house that use a case-mounted PSU are Corsair ones and all use the same cable types. While I don’t tend to mess with power cables much after a system is built out, not having to worry about using the wrong cable for a given power supply is nice.
Using a power calculator, the recommended PSU wattage for this system was between 800 and 900W. I thought about going with an 850W model, but decided for a little headroom if I decided to get a more powerful (and more power hungry) graphics card down the road. Although with prices on graphics cards being what they are these days, I doubt I could justify the expense of an upgrade any time soon. Probably what will happen is I will upgrade the graphics card in my gaming PC at some point, put the card previously in that into the server (it has a little more VRAM and better AI capabilities), and gift the 3080Ti to someone who could use it. The downside of over-spec’ing the PSU is that it will usually not be running at peak efficiency.
Case Fans: Noctua NF-F12 PWM and Noctua NF-A8 PWM (2)
For several years now, I pretty much just use Noctua fans. The fans that I had in both of the home servers were originally just a random collection of mostly 3-pin sleeve-types found in my “spare computer parts” closet. They worked well enough to keep things at a decent temperature inside the case, but were getting loud (not a big deal being in the basement) and were obviously, (at least to me), getting close to failure. I also liked moving to 4-pin fans so the motherboard could control their speed based on need.